Display Image In WPF using XAML and C# |
您所在的位置:网站首页 › image wpf › Display Image In WPF using XAML and C# |
Display Image In WPF using XAML and C#
|
Introduction
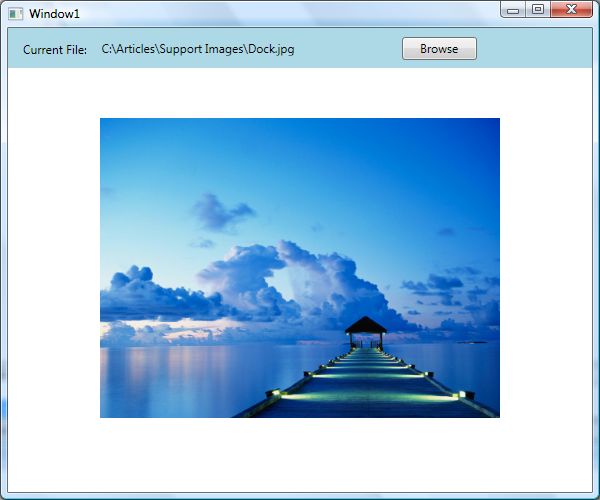
The element in XAML represents the Image control in WPF that is used to display images. We can also use the Image class in C# and WPF to create an Image control dynamically. The code example in this article shows how to view, stretch, rotate, and manipulate images in a WPF app using C#. The Image ClassThe Image class in C# represents an image control in WPF that is used to load and display an image. The Image control displays .bmp, .gif, .ico, .jpg, .png, .wdp, and .tiff files. If a file is a multi frame image, only the first frame is displayed. The frame animation is not supported by the control. The Source property of the Image class is the file an image displays. The Source property is a BitmapImage, that can be converted using the following code. ImageViewer1.Source聽=聽new聽BitmapImage(new聽Uri("Creek.jpg",聽UriKind.Relative));聽聽In the preceding code snippet, UriKind lets you specify if the image is relative to the application path or has an absolute path. I've created a WPF application with two labels, a button, and an Image control. The XAML code looks like this. 聽聽 聽聽聽聽聽聽 聽聽聽聽聽聽聽聽Current聽File:聽聽 聽聽聽聽聽聽 聽聽聽聽聽聽 聽聽聽聽聽聽 聽聽聽聽聽聽聽聽Browse聽聽 聽聽聽聽聽聽聽聽聽聽聽聽聽聽聽聽聽聽聽聽聽聽 聽聽聽聽聽聽 聽聽 聽聽聽聽聽聽聽聽聽聽聽聽聽 聽聽The application UI looks like this.
Figure 1 Now double clock on the Browse button and add an event handler. This is where we will browse a file on the computer using Windows File Dialog. The Browse button click event handler looks like the following: private聽void聽BrowseButton_Click(object聽sender,聽RoutedEventArgs聽e)聽聽 {聽聽 聽聽聽聽OpenFileDialog聽dlg聽=聽new聽OpenFileDialog();聽聽 聽聽聽聽dlg.InitialDirectory聽=聽"c:\\";聽聽 聽聽聽聽dlg.Filter聽=聽"Image聽files聽(*.jpg)|*.jpg|All聽Files聽(*.*)|*.*";聽聽 聽聽聽聽dlg.RestoreDirectory聽=聽true;聽聽 聽聽 聽聽聽聽if聽(dlg.ShowDialog()聽==聽System.Windows.Forms.DialogResult.OK)聽聽 聽聽聽聽{聽聽 聽聽聽聽聽聽聽聽string聽selectedFileName聽=聽dlg.FileName;聽聽 聽聽聽聽聽聽聽聽FileNameLabel.Content聽=聽selectedFileName;聽聽 聽聽聽聽聽聽聽聽BitmapImage聽bitmap聽=聽new聽BitmapImage();聽聽 聽聽聽聽聽聽聽聽bitmap.BeginInit();聽聽 聽聽聽聽聽聽聽聽bitmap.UriSource聽=聽new聽Uri(selectedFileName);聽聽 聽聽聽聽聽聽聽聽bitmap.EndInit();聽聽 聽聽聽聽聽聽聽聽ImageViewer1.Source聽=聽bitmap;聽聽 聽聽聽聽}聽聽 }聽聽Click on the Browse button to browse the files, and the selected file will be displayed in the Viewer.
Figure 2 How to view an Image in WPF?The Image element in XAML represents a WPF Image control and is used to display images in WPF. The Source property takes an image file that will be displayed by the Image control. The following code snippet shows the Flower.jpg file using an Image control. 聽聽You can control the width and height of an image that is being displayed in the Image control by setting its Width and Height properties. 聽聽One other way to set the Image.Source is by creating a BitmapImage. The following code snippet uses a BitmapImage created from a URI. How to view an Image in WPF Dynamically?The Image class in WPF represents an Image control. The following code snippet creates an Image control and sets its width, height, and Source properties. How to stretch an Image in WPF using Image control?The Stretch property of the Image describes how an image should be stretched to fill the destination rectangle. A value of Fill will cause your image to stretch to completely fill the output area. When the output area and the image have different aspect ratios, the image is distorted by this stretching. To make an Image preserve the aspect ratio of the image, set this property to Uniform, which is the default value of Stretch. The StretchDirection property of Image describes how scaling applies to content and restricts the scaling to named axis types. It has three values UpOnly, DownOnly, and Both. The UpOnly value indicates that the image is scaled upward only when it is smaller than the parent. The DownOnly value indicates that the image is scaled downward when it is larger than the parent. Both value stretches the image to fit the parent. The following code snippet sets Stretch and StretchDirection of an Image control. How to rotate an Image in WPF?The Rotation property of BitmapImage is used to rotate an image. It has the four values Rotate0, Rotate90, Rotate180 and Rotate270. The following code snippet rotates an image to 270 degrees. How to apply grayscale on an Image in WPF?The FormatConvertedBitmap is used to apply the formatting of images in WPF. The FormatConvertedBitmap.Source property is a BitmapImage that will be used in the formatting process. This code creates a BitmapImage. This code snippet creates a FormatConvertedBitmap from the BitmapImage created above. The DestinationFormat property of FormatConvertedBitmap is used to apply formatting to images. The following code snippet sets the formatting of an image to Gray. The complete source code looks like this. How to crop an Image in WPF?CroppedBitmap is used to crop an image. It takes a BitmapImage as the source and a rectangle that you would like to crop. The following code snippet crops and displays an image. private聽void聽CropImageButton_Click(object聽sender,聽RoutedEventArgs聽e)聽聽 {聽聽 聽聽聽聽//聽Create聽a聽BitmapImage聽聽 聽聽聽聽BitmapImage聽bitmap聽=聽new聽BitmapImage();聽聽 聽聽聽聽bitmap.BeginInit();聽聽 聽聽聽聽bitmap.UriSource聽=聽new聽Uri(@"C:\Books\Book聽WPF\How聽do聽I\ImageSample\ImageSample\Flower.JPG");聽聽 聽聽聽聽bitmap.EndInit();聽聽 聽聽 聽聽聽聽//聽Create聽an聽Image聽聽聽 聽聽聽聽Image聽croppedImage聽=聽new聽Image();聽聽 聽聽聽聽croppedImage.Width聽=聽200;聽聽 聽聽聽聽croppedImage.Margin聽=聽new聽Thickness(2);聽聽 聽聽 聽聽聽聽//聽Create聽a聽CroppedBitmap聽from聽BitmapImage聽聽 聽聽聽聽CroppedBitmap聽cb聽=聽new聽CroppedBitmap((BitmapSource)bitmap,聽聽聽 聽聽聽聽聽聽聽聽new聽Int32Rect(20,聽20,聽100,聽100));聽聽聽聽聽聽聽聽 聽聽聽聽//聽Set聽Image.Source聽to聽cropped聽image聽聽 聽聽聽聽croppedImage.Source聽=聽cb;聽聽 聽聽 聽聽聽聽//聽Add聽Image聽to聽Window聽聽 聽聽聽聽LayoutRoot.Children.Add(croppedImage); 聽 } 聽 |

【本文地址】